Category Archives: Arduino

Arduino based projects and resources

Simplified Setup for Arduino on Raspberry Pi

I just got back from the Open Hardware Summit and World Maker Faire. It was fantastic and I spent a day and a half doing demos of Alamode and the Raspberry Pi in the Makershed. I’ll have more on that later, but I got a lot of questions about setting up Arduino, and I realized that things have been simplified since my last blog post on the subject.

I recommend you download the latest raspbian (these instructions are for that version.)

2012-09-18-wheezy-raspbian

After running through the setup (raspi-config) which runs automatically the first time do a:

[code]$ sudo apt-get update
$ sudo apt-get install arduino[/code]

You used to have to get the avrdude and gcc packages separately and install them in an unzipped version of arduino, but there’s now an up-to-date package. This works out of the box with FTDI Arduinos, but Uno’s /dev/ttyACM0 and the Raspberry Pi /dev/tty/AMA0 aren’t recognized by the Arduino IDE. To do that we create some “udev rules” that create symbolic links to those devices that are named /dev/ttyS1 (uo) and /dev/ttyS0 (alamode) respectively.

I created a setup script to do the hard work for you (note the $ represents the command prompt, don’t type that!):

[code]$ wget https://github.com/wyolum/alamode/blob/master/bundles/alamode-setup.tar.gz?raw=true -O alamode-setup.tar.gz
$ tar -xvzf alamode-setup.tar.gz
$ cd alamode-setup[/code]

If you want to be ready to run Alamode, and the Uno run:

[code]$ sudo ./setup[/code]

which disables logging and getty on the internal serial port (so you can use it to program alamode), sets up the /dev/tty links, and installs a modified avrdude that has a new programmer type, -c alamode. This should be completely safe, as I only and (I think properly) added a new programmer type, but I haven’t tested it thoroughly on other programmer types. It also sets up the board type for alamode in the Arduino IDE.

reboot to get rid of the logging and getty.

If you just want Uno support, type:

[code]$ sudo arduino-setup[/code]

Here you probably don’t have to reboot, just

[code]$ sudo udevadm trigger[/code]

If you want Bonjour, which will allow you to refer to your raspberry Pi on the local network as raspberrypi.local

[code]$ sudo apt-get update
$ sudo apt-get install libnss-mdns

[/code]

Arduino Setup instructions for Raspberry Pi

These instructions are for setting up an Arduino and alamode friendly environment on the Pi. Gathered from many sources (see earlier posts) and updated with the latest info.

Download and install Linux Image

Download the Black Raspberry Distribution from Adafruit:
http://learn.adafruit.com/adafruit-raspberry-pi-educational-linux-distro
DIrect link to the current (0.2 version):
http://adafruit-raspberry-pi.s3.amazonaws.com/Occidentalisv02.zip

Burn to your favorite sd card. Helpful tips at:
http://elinux.org/RPi_Easy_SD_Card_Setup

If you need to set up Wifi, or other things, follow the instructions at the first link above.

Configure your keyboard and Timezone

It’s difficult to edit config files when the quote key produces a different symbol.
Unless you are in or have a Great Britain keyboard, you’ll need to:

[code]sudo dpkg-reconfigure keyboard-configuration
sudo dpkg-reconfigure tzdata[/code]

Reboot

Serial Port configuration

AlaMode can communicate via the UART pins of the GPIO connector. Unfortunately, for now, the Arduino IDE doesn’t recognize the device name /dev/ttyAMA0, so you’ll need to create an alias. By the way, it also doesn’t recognize the Arduino UNO (/dev/ttyACM0) so you can handle this the same way.
[code]

sudo vi /etc/udev/rules.d/80-alamode-rules

KERNEL==”ttyAMA0″,SYMLINK+=”ttyS0″ GROUP=”dialout”
KERNEL==”ttyACM0″,SYMLINK+=”ttyS1″ GROUP=”dialout”

[/code]

Next, disable logging messages:
This bit disables logging to the GPIO UART, so if you are using an Arduino via USB, it’s not necessary.
[code]Edit /boot/cmdline.txt
From:

dwc_otg.lpm_enable=0 rpitestmode=1 console=ttyAMA0,115200 kgdboc=ttyAMA0,115200 console=tty1 root=/dev/mmcblk0p2 rootfstype=ext4 rootwait

to:

dwc_otg.lpm_enable=0 rpitestmode=1 console=tty1 root=/dev/mmcblk0p2 rootfstype=ext4 rootwait[/code]

deleting the two parameters involving the serial port /dev/ttyAM0
You also have to edit /etc/innitab to remove the login (getty)
comment out:

[code]2:23:respawn:/sbin/getty -L ttyAMA0 115200 vt100[/code]

Reboot

Installing the Arduino IDE

Before getting any of the other packages:

[code]sudo apt-get update[/code]

and again:

[code]sudo apt-get update[/code]


The IDE is written in Java (based on Processing) and while Oracle doesn’t have an official Java for the ARM core in the Pi, the Open JDK has been ported. It doesn’t have a JIT (Just In Time Compiler) so it’s a little slower, but it works.
First grab the Arduino IDE code. 1.01 is heavily entwined with the native GCC toolchain, so is a lot more work and not recommended. For now, stick with 1.0.

[code]wget http://arduino.googlecode.com/files/arduino-1.0-linux64.tgz

tar zxvf arduino-1.0-linux64.tgz[/code]

The Arduino IDE is written in Java, but there are native parts to do compilation for the atmega328p  microcontroller. Fortunately those have also been ported:

[code]sudo apt-get install avr-libc

sudo apt-get install libftdi1

sudo apt-get install avrdude[/code]

Java:

[code]sudo apt-get install openjdk-6-jre[/code]

Serial support:

[code]sudo apt-get install librxtx-java[/code]

And then copy the native stuff into the Arduino directory:

[code]cd arduino-1.0

for i in $(find . -name “librxtxSerial.so”) ; do cp /usr/lib/jni/librxtxSerial.so $i ; done

for i in $(find . -name “RXTXcomm.jar”) ; do cp /usr/share/java/RXTXcomm.jar $i ; done

cp /usr/bin/avrdude /home/pi/arduino-1.0/hardware/tools/avrdude

cp /etc/avrdude.conf /home/pi/arduino-1.0/hardware/tools/avrdude.conf

[/code]

And probably reboot again, and then you should be good to go! Contact me on Google + and let me know how it goes!

Introducing Raspbery Pi à la mode

Our first prototypes are back, and working quite well! SeeedStudio fabricated the prototype boards and quickly sourced the parts.  The boards were of excellent quality. We ran into a few hiccups along they way, but Seeed Studio took care of them right away, and rushed to make up time.

If you haven’t been following, Anool Mahidharia, Justin Shaw and I from the Wyolum.com OSHW collaborative have been developing a stackable Arduino compatible for the Raspberry Pi.

While there are lots of emerging examples of interfacing hardware to the Pi, it’s just not as easy as the Arduino, and the Arduino already has hundreds of libraries for interfacing with motors, sensors, and displays. While you can always plug an Arduino into the USB port, but it’s not as neat and embed-able as a a GPIO interfaced board. You can write a program on the Pi in any language you want to control or monitor your Arduino application, making Internet integration and control super easy. In addition you can even program the AlaMode directly from the Pi.

Here are the features including a few extra goodies:

  • Flexible power. Can be powered directly from the Pi, standalone with a battery or wall-wart, or USB power. This is important if your shield takes more power than the Pi can provide or if you want to undock it for standalone operation.
  • Programmable via the Pi’s UART on the GPIO pins, or an FTDI USB-Serial adapter or ISP.
  • Header for connecting Fastrax UP501 GPS.
  • DS3234 Real time Clock. The Pi doesn’t have it’s own battery backed RTC. You can set a program in the AlaMode to report the time to the Pi via serial or I2C
  • Micro-SD card slot. Useful for datalogging, and big-memory  for your Arduino applications
  • Row of Servo Headers connected to the PWM pins with a configurable power and ground rail

We’re in limited Beta right now, but as soon as it’s thoroughly tested, we hope to produce them for sale as soon as we can!

Introducing: Carduino, a micro for Car hacking.

Becoming a member of Wyolum has it’s privileges (and responsibilities)! While waiting for my AlaMode boards to come back, I’ve been helping out on another project led by David Pincus, with electronics and layout by Anool Mahidharia.

David originally wanted this to supply power to his new in-car DVR that has the capability of recording triggered by motion detected by it’s on-board accelerometers. He was worried that if he didn’t drive the car for a few days, it might drain the battery. This little Arduino compatible board can monitor two voltages (through a precision resister voltage divider) and shut off a solid state relay if the voltage falls below a selectable value. There’s also an optional display board (shown here displaying the supply voltage). If you don’t want to use the display, the row of pins is a handy breakout of many of the unused Arduino pins.


Other features:

  • i2C port (sensors anyone?)
  •  2.5 A solid state relay.
  • Jumper block for setting shutdown voltage. Here we got a bit clever, using a resistor ladder tied to an analog pin. Uses just one pin but multiple values.
  • FTDI and ISP programmable
  • Can be powered by FTDI or VBATT input (up to 15V)
  • Protection diodes on all the power inputs
  • Screw terminals for easy connection.
  • Easy to assemble through hole kit.

We’re making a few tweaks, and then we are thinking about doing a kickstarter to judge interest. We’d love to hear what you’d do with it, I think the applications aren’t limited to cars. Certainly, boats, RV’s and maybe solar applications also come to mind.

I’ve learned a lot on this project. I did the logistics, ordering the boards from Laen (http://oshpark.com, Dorkbot PDX’s new online submission system), kitting parts and writing some test code and trying out the first version.

If you are interested, give us a shout (either on my google+ stream, or at the wyolum.com forums.)

Bleeding edge: Arduino on Raspberry Pi

Well, Arduino doesn’t “just work” even with the instructions I gave in my last post. If you don’t “prepare”  your distro carefully, you’ll run into the comm problems I did (and thanks to Mark Amos, for pointers and encouragement!).

First, make sure you have a good power supply both for your Pi, and for your USB hub.

My belkin hub (one would think it would be good) would drop the mouse as soon as the Arduino IDE started up.

I ended up using a Staples hub (I can’t find it on their website, must be older.) powered off a 2 port Belkin USB power supply. I’m using a separate high amp Griffin USB power supply for the Pi.

I was having a problem in which I could download programs via AVRdude, but the Arduino IDE would have communication problems, and then the ports would be locked after Arduino was exited.

I believe the problem was due to me not setting the timezone, and date on the Pi. I think it didn’t like living in 1969.  I don’t know if this was a problem for the software install, or the port handling by Arduino, but once I properly prepared, everything worked!

I’ve rebuilt the system several times and here are a few tips.

I’m using debian squeeze from the Raspberry pi site, and it defaults to a British keyboard layout. That’s fine if you’re there, but some of the following edits will be painful unless you change:

[code]sudo dpkg-reconfigure keyboard-configuration
sudo dpkg-reconfigure tzdata[/code]

reboot

Before getting any of the other packages:

[code]sudo apt-get update[/code]

and again:

[code]sudo apt-get update[/code]

FTDI Arduinos work fine with the driver loaded in the last post, but the UNO isn’t recognized right away. This is because the IDE only looks for certain names (/dev/ttyUSB1, /dev/ttyS0 etc.)

Once again the RaspberryPi@homelabs blog comes through:

GarretT says:

[code]

There’s a little hack you have to do to make the IDE work with UNO. I think it stems from the way the code checks for serial devices.

1) Before running the Arduino IDE, plug in your Arudino UNO.
2) Observe that there is now the device /dev/ttyACM0 writable by the dialout group of which pi is a member.
3) Make a hard link ttyS0 to that device. It’s a little easier if you cd to /dev.

cd /dev
sudo ln ttyACM0 ttyS0

4) Start the Arduino IDE and load a sketch.
5) Under Tools->Serial Port select /dev/ttyS0
6) Upload your sketch. Sweet!

[/code]

Likewise you can link the internal UART:

[code]
sudo ln /dev/ttyAMA0 /dev/ttyS1

[/code]

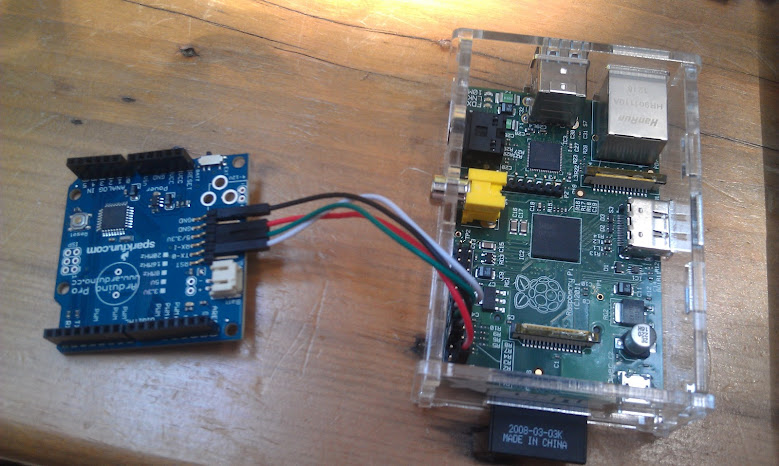
I hooked up an Arduino Pro 3.3v, and by holding down the reset until the IDE says “downloading” I was successfully able to download to it via the GPIO mino UART

Important Note: Those hard links go away with each boot, so you have to make them again each time you reboot before running the IDE.


Preparing for à la mode: Raspberry Pi and Arduino

Well, I got my Raspberry Pi, and preparations are well underway to make an Arduino compatible clone that fits right on top.

Anool Mahidaria has completed an initial circuit design, and I’ve gotten some of the software set up. Lots of information out there that helped me figure out what to do, so I thought I’d compile it here in one place.

à la mode will connect via the uart on the GPIO, so we need to figure out how to enable serial communications, and get the Arduino environment installed.

Serial port: An embarrassment of riches?

The Pi’s Broadcom brain has a very rich set of peripherals, unfortunately it was hard for the Pi’s designers to route them all out to a connector. There’s a limited functionality min-uart that is very well supported, and at least in the debian image I’ve tried has drivers.

It doesn’t have hardware handshaking or DTR (needed for auto reset on the Arduino) but is supported at this stage so I think that’s what we’ll go with. There’s also a fully featured UART, and most of it’s compatible pins are brought out to the GPIO connector, but as far as I can tell, it’s not fully supported in the distributions generally available for the Pi.

The GPIO connector is well documented on the Pi’s wiki:

But I found this blog post most helpful: http://lavalink.com/2012/03/raspberry-pi-serial-interfacing/ from which I get this useful illustration.

That’s great, but it turns out that the Serial port is a little too well supported. (Caveat, I’m talking about the recommended Debian Squeeze image) You can log into it as a console! This, of course, prevents you from opening the port in a program (such as Arduino), so we need to disable logins on this port, as well as logging messages that go out. This post explains how to disable both.

I’ll repeat the instructions here, in case the link goes away:

First, disable logging messages:

Edit /boot/cmdline.txt

From:

[code]dwc_otg.lpm_enable=0 rpitestmode=1 console=ttyAMA0,115200 kgdboc=ttyAMA0,115200 console=tty1 root=/dev/mmcblk0p2 rootfstype=ext4 rootwait[/code]

to:

[code]dwc_otg.lpm_enable=0 rpitestmode=1 console=tty1 root=/dev/mmcblk0p2 rootfstype=ext4 rootwait[/code]

deleting the two parameters involving the serial port /dev/ttyAM0

You also have to edit /etc/innitab to remove the login (getty)

comment out:

[code]2:23:respawn:/sbin/getty -L ttyAMA0 115200 vt100[/code]

then reboot.

Arduino IDE:

The Homelabs raspberry pi blog has good concise instructions for installing the Arduino IDE. The IDE is written in Java (based on Processing) and while Oracle doesn’t have an official Java for the ARM core in the Pi, the Open JDK has been ported. It doesn’t have a JIT (Just In Time Compiler) so it’s a little slower, but it works.

First grab the Arduino IDE code. (you can change the url if you want the latest)

[code]wget http://arduino.googlecode.com/files/arduino-1.0-linux64.tgz
tar zxvf arduino-1.0-linux64.tgz[/code]

The Arduino IDE is written in Java, but there are native parts to do compilation for the atmega328p  microcontroller. Fortunately those have also been ported:

[code]
sudo apt-get install avr-libc
sudo apt-get install libftdi1
sudo apt-get install avrdude

[/code]
Java:

[code]sudo apt-get install openjdk-6-jre[/code]

Serial support:
[code]sudo apt-get install librxtx-java[/code]

And then copy the native stuff into the Arduino directory:

[code]
cd arduino-1.0
for i in $(find . -name “librxtxSerial.so”) ; do cp /usr/lib/jni/librxtxSerial.so $i ; done
for i in $(find . -name “RXTXcomm.jar”) ; do cp /usr/share/java/RXTXcomm.jar $i ; done
cp /usr/bin/avrdude /home/pi/arduino-1.0/hardware/tools/avrdude
cp /etc/avrdude.conf /home/pi/arduino-1.0/hardware/tools/avrdude.conf

[/code]

After this, you can attach an Arduino to one of the USB ports, or (carefully) a 3.3 v clone to the GPIO pins.

More to come!


Raspbery Pi à la mode ?

Lot’s of people are excited about the Raspberry Pi®, a complete computer for $25 (or $35 with ethernet).
The initial shipment is entirely sold out, and there are 200,000 more on order. Lots of people have been saying that this is the end of the Arduino, as it’s about the same cost, a full linux system with keyboard, mouse, and hdmi video output.

I think this is an oversimplification. Arduino is fantastic at interfacing to the physical world in a way that no linux (or Windows) PC could hope to approach at any cost.

The Pi does have a GPIO connector, but it pales in comparison to the humble Arduino. No built in PWM (servos anyone?) and no Analog to digital conversion.

Why throw the baby out with the bathwater? How about some delicious ice cream with your Raspberry Pi?
As a member of the amazing Open Source Hardare collective Wyolum.com,  I’m working with Justin Shaw and  Anool Mahidharia on “à la mode”: an Arduino clone specifically for the Raspberry Pi (That rendering above is courtesy of our  fabulous  EE  Anool) . You can of course connect an Arduino to a Pi USB port, but when you want a turnkey solution, how about an Arduino compatible “plate” (what the Pi folks call shields) that fits right on top of the Raspberry Pi.

You can plug your existing shields right in,  and you can even run the Arduino IDE on the Pi. Since the Pi’s core mission is to provide equal access to computing to all children, this will also give the kids the opportunity to mix it up “Arduino-style” with real world hardware.

We couldn’t have a vanilla add-on, so we added:

  • A battery backed real time clock: RTC: DS3231 (same as ChronoDot)
  • uSD card for logging
  • Socketed Atmel Atmega 328p in case you make a wiring mistake and need to replace it.

We’re sending off for prototype boards soon, so if you have feedback, let us know! Join the conversation at the Wyolum.com forums.

Raspberry Pi® is a trademark of the Raspberry Pi Foundation.

Arduino Library for Scratch Sensor Board Emulation

I re-wrote the simple sketch as an Arduino Library for Scratch Sensor Board (picoboard) emulation.

You can download it at github

Unzip the contents of this repository into a directory called ScratchSensors in the Arduino libraries directory (or in Sketchbook/libraries)

In your sketch: #include <ScratchSensors.h>

and then: ScratchSensors Scratchboard;

In Setup: Scratchboard.init();

Sensor values are stored in an array internally to the ScratchSensors class called Values[];
The picoboard/Scratch sensor board that is emulated has specific sensor labels that are reported:
#define RESISTA 0
#define RESISTB 1
#define RESISTC 2
#define RESISTD 3
#define SLIDER 4
#define LIGHT 5
#define SOUND 6
#define BUTTON 7

Values should be between 0 and 1023. These are scaled by scratch to be between 0 and 100. BUTTON is handled in a special way: 0 is depressed and 1023 is not pressed. Let’s say you have an analog sensor like an accelerometer connected to Arduino pins A0, A1, and A2. Then during loop():

Scratchboard.Values[RESISTA] = analogRead(A0);
Scratchboard.Values[RESISTB] = analogRead(A1);
Scratchboard.Values[RESISTC] = analogRead(A2);

then, write the packets out to the serial/usb port: Scratchboard.report();

There’s an example in the examples directory based on the Sparkfun midi shield. It has two pots and three buttons. Of course only one of the buttons can be used with the Scratch buttonpressed semantics, but the others can be tested for specific values.

Interfacing Scratch to the Arduino Platform

I’m a big fan of Scratch, the educational programming language created at MIT. International Scratch Day is coming up, and when we went two years ago, we had a blast. Last time, I added a distance sensor to an Arduino, made it emulate a Scratch Sensor Board, and  put it under a trampolene. This year, I decided to document the general process of making your own scratch sensors and bring a compact sensor module for the kids to play with.

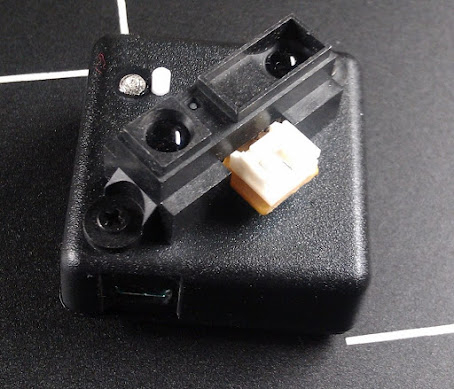
At one point during our research at work, we needed a way to measure the movement and relative distance of a camera platform, so I designed, and my tech put together a combination of a Teensy (Arduino Compatible microcontroller), an Adafruit ADXL335 Accelerometer breakout, and a Sharp IR distance sensor.

I dug up my old code for the trampolene hack, which was based on some code I got off the Scratch forums. It didn’t work!

What we are actually doing is emulating what was originally called a “Scratchboard” and now produced by a company called the Playful invention company and called a “PicoBoard”.

There’s a spec (and schematics) at http://info.scratch.mit.edu/sites/infoscratch.media.mit.edu/files/file/ScratchBoard_Tech_InfoR2.pdf

Turns out, the platform used to be more forgiving, and now it expects a report of all the sensors (whether we are using them or not.)

The IR distance Sensor outputs an analog voltage proportional to the distance to the nearest thing in it’s path, and likewise the accelerometer outputs a voltage proportional to the acceleration (including gravity). I mapped the distance sensor to the “slider” sensor, and the X, Y and Z outputs to the Resistance A, B and C sensors.

Here’s a demo video:

[youtube]http://www.youtube.com/watch?v=wVa8QUz5DxI[/youtube]

I’m planning on re-working the interface code into an Arduino Library, and I’ll post that here when I get it done.

In the meantime here’s the Arduino code:

// Scratchboard emulation
// by Kevin Osborn
// http://baldwisdom.com
// Feel free to use this code in any way you wish! (Though if you want to link
// to my blog, that would be cool)
// The Scratchmote has a sharp ir distance sensor
// and a 3 axis accellerometer

#define DISTSENSE A0
#define ACCELX    A1
#define ACCELY    A2
#define ACCELZ    A3

#define TESTMODE  0

// Format output for ScratchBoard emulation
// sensor=0-7, value=0-1023 (rescaled by Scratch to 0-100)
// 0="A", 1="B", 2="C", 3="D",
// 4="Slider", 5="Light", 6="Sound", 7="Button"
void ScratchBoardSensorReport(int sensor, int value)
{
  Serial.write( B10000000
                 | ((sensor & B1111)<>7) & B111));
  delayMicroseconds(400);
  Serial.write( value & B1111111);
}
int flatx,flaty,flatz; // might be used to set midpoint
int maxX,minX; //testing purposes
int lastx,lasty,lastz;

void setup()
{
  pinMode(DISTSENSE, INPUT);
  pinMode(ACCELX,INPUT);
  pinMode(ACCELY,INPUT);
  pinMode(ACCELZ,INPUT);

  lastx =maxX= minX = flatx=analogRead(ACCELX);
  lasty = flaty=analogRead(ACCELY);
  lastz = flatz=analogRead(ACCELZ);

  Serial.begin(38400);
}

void loop()
{
  int distance = abs(map(analogRead(DISTSENSE),0,650,0,1023)-1023);
  //experimenting with the ADXL335 gives us readings between low single digits
  // and < 700 for human powered movements   int x = map(analogRead(ACCELX),0,700,0,1023);   int y = map(analogRead(ACCELY),0,700,0,1023);   int z = map(analogRead(ACCELZ),0,700,0,1023);      int rx = (x +lastx)/2;   int ry = (y +lasty)/2;   int rz = (z +lastz)/2;      lastx = rx;   lasty = ry;   lastz = rz; #if TESTMODE Serial.println(distance); /* Serial.print("x,y,z= "); Serial.print(x);Serial.print(","); Serial.print(y);Serial.print(","); Serial.println(z); */ if (x > maxX) maxX=x;
if (x< minX) minX=x;
Serial.print("maxX = ");Serial.println(maxX);
Serial.print("minX = ");Serial.println(minX);
delay(500);

#else
if (Serial.available())
{
  if (Serial.read() == 0x01){
  ScratchBoardSensorReport(0,rx);
  ScratchBoardSensorReport(1,ry);
  ScratchBoardSensorReport(2,rz);
  ScratchBoardSensorReport(3,0);
  ScratchBoardSensorReport(4,distance);  
  ScratchBoardSensorReport(5,0);
  ScratchBoardSensorReport(6,0);
  ScratchBoardSensorReport(7,0);
  }
 //ScratchBoardSensorReport(1,analogRead(POT2));
 // ScratchBoardSensorReport(7,digitalRead(BUTTON1)?0:1023);
  delay(30);
}
#endif

}

The Scratch examples are on the scratch site:

Note you can’t play them directly from the site, as you need the sensors!