Announcing the formal release of BootDrive for Arduino. If you’ve been reading the blog, you know that I’ve been working with Justin Shaw of Wyolum labs to enable their I2SD (Arduino clone with a micro-sd card) to bootload a program onto another Arduino. After battling several issues, mostly related to porting avrdude code to the Arduino (assumptions about infinite memory, etc!) it’s working well enough people can fool around with it.
Right now the code looks for a single file (“program.hex”) and waits 5 sec and then blasts it into the target arduino. Details about setting up to try this yourself follow the video.
Here’s a demo of it in action:
[youtube]http://www.youtube.com/watch?v=i4wJ4kRO80E[/youtube]
If you’d like to try this with a couple of Arduinos, you’ll also need an SD card (or micro-sd) interface such as the Adafruit Micro-SD breakout. This board is great because it has onboard 3.3v conversion so it’s safe to use with 5V (stock) Arduinos. Download the code from github: https://github.com/osbock/Baldwisdom/tree/master/BootDrive
or a zipped version here
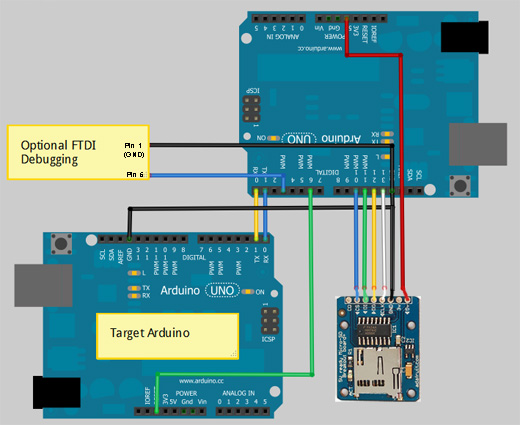
Hook up your Arduinos like this:
The basic setup is:
Arduino Control:
Master Digital Pin6 –> Target reset
GND –> GND
MASTER Digital Pin1 –>Target Digital Pin2
MASTER Digital Pin2 –>Target Digital Pin3
SD Card Interface:
Master Digital Pin 10 –> SD-breakout CS
Master Digital Pin 11 –> SD breakout DI
Master Digital Pin 12 –> SD breakout DO
Master Digital Pin 13 –> SD breakout CLK
Master GND –> SD breakout GND
Master 5V –> SD breakout 5V
Optional debugging serial interface (This lets you see error messages and the like)
Master GND –> FTDI cable Pin 1 (GND)
Master Digital Pin 4 –> FTDI cable Pin 5 (diagram is wrong, but you can change it in the code if you need to)
Here are the defines you can change to swap the pins around:
#define BOOT_BAUD 115200 // This is the Arduino UNO’s bootloader baud rate. Other boards are different!
#define DEBUG_BAUD 19200 // for software serial debugging
#define txPin 4
#define rxPin 5 // not really used…
#define rstPin 6
Also if you want to put your SD card on a different line (or are using a shield that uses a different chip select) change this:
const int chipSelect = 10;
Action!
Right now, 5 seconds after initialization, the program blasts a file called “program.hex”. You can add your own user interface to select amongst multiple programs.
Just call:
void programArduino(char *filename)
with the filename, e.g.”
programArduino("program2.hex");
You can build new hex files by grabbing them from the Arduino build directory. Make sure you have the IDE set up for your target board and press the “compile/verify” button.
From http://arduino.cc/en/Hacking/BuildProcess:
The .hex file is the final output of the compilation which is then uploaded to the board. During a “Verify” the .hex file is written to /tmp (on Mac and Linux) or \Documents and Settings\<USER>\Local Settings\Temp (on Windows). During upload, it’s written to the applet sub-directory of the sketch directory (which you can open with the “Show Sketch Folder” item in the Sketch menu)
Note on Windows7, the base directory is \users\<USER> \appdata\local\Temp\build<some bunch of numbers>.tmp\<sketchname>.cpp.hex
Note that if you want to load an Arduino other than UNO, you’ll need to change the baud rate. You can find that in “hardware/arduino/boards.txt” in the arduino directory. This won’t work on MEGA based Arduinos as they use the stk500v2 protocol (thanks westfw!)
