Category Archives: workshops

Arduino Robot Class preview

I’m teaching an Arduino Robot class June 29 from 6-8pm at YouDoitElectronics in Needham, Ma. The cost is $99 and you get to take home the robot you build. I’ll show you how to use an Arduino to control DC motors, and read sensors to react to the environment. The robot we’re building will have a sonar sensor for distance, and two line detectors for following a line.
To register email your name phone number and number of participants to events@youdoitelectronics.com. Please include Arduino Robot Workshop in the subject line. You will receive a call back within 1-2 business days. Fee is required at time of registration prior to the start of the workshop. Once registration and payment are complete a reservation confirmation number will secure your spot.

Arduino Workshop and Arduino Resources page

youdoit-arduino class

Had a full house at an Intro to Arduino Workshop at YouDoIt Electronics in Needham last night. Getting ready for this prompted me to start up an Arduino Resources page and update my Intro to Arduino Presentation (which, unfortunately I didn’t get to use due to technical difficulties…)

YouDoIt Electronics is a terrific local resource, carrying tons of Sparkfun and Adafruit products (as well as tons of mechanical and electrical parts, educational toys, AV equipment, you name it!) Thanks Melissa and John for sponsoring me!

Interactive Wall at the Duxbury Free Library

I was Maker in Residence at the Duxbury Free Library in August, where I worked with Teens and some adults to create an Interactive wall for display at the Library.

I met Teen Librarian Ellen Snoeyenobs at the first Make a Makerspace conference at the Artisan’s asylum several years ago, and we’ve been collaborating on bringing more maker activities to her library over the last 2 years. She has an excellent blog reflecting on their successes, failures, and tips : http://librarymakerspace.blogspot.com/

She has her own excellent video here:

Lessons learned

  • Something for everyone. There are art activities for those who won’t go near tech stuff, and plenty of wiring and coding for the techies. Girls, boys, adults alike found something to do.
  • Drawing on skills learned in the past helps to get things done. We did one session on Arduino at the beginning, but in the end, those who already had Arduino experience ending up contributing most in that area.
  • Include a variety of activities. Kids who liked 3D printing and design did various bits to glue on, and use, including a spider that goes up and down. The 3Doodler was used a lot to add decorative elements, as well as enhance some of the 3D prints. And of course, Arduino brought it all to life.
  • Think Off the Wall. Ellen was originally inspired by an interactive wall she saw at MIT. The library, however, wasn’t too keen to be hacking into their existing walls. Ellen came up with the idea of a portable partition, and I helped select one (made of poly-carbonate) that we could drill. It had the additional advantage of being semi transparent, so we could mount our fireflies (addressable LEDs,) behind the wall.
  • Surprise learning. There were all sorts of bonus learnings, including how to scale a drawing up using a grid!

Technology

  • The library had previously received a grant that enabled them to buy a bunch of Spark Fun Inventors kits. We used velcro to attach the Redboards and their attached breadboards to the back of the wall.
  • We used a PIR motion sensor to trigger the bird moving, and cheap Chinese HC-SR04 ultrasound distance sensor to light up the peacock’s tail as you waked closer.
  • WS-2812 LED strips provided bling for both the peacock’s tail and the fireflies.
  • Birdsong was provided by a Sparkfun MP3 Shield
  • Movement was done with micro servos, and one continuous rotation servo from parallax.
  • The shifty eyed fox was implemented by a great design from Dampboot on Thingiverse

Come see it!

Our Grand Reveal of the Arduino Interactive Garden Wall will take place on
Thursday, September 10th at 4 p.m. on the Upper Level of the Duxbury Free Library.

We’re hoping some of the Teens as well as adults who had a hand in making it will talk about the experience.

Preparing for a Bristlebots Workshop

The Earl Center folks at Wheelock college are doing Bristlebots at the Cambridge Science Festival and I put together a bunch of kits for them. I updated my resource page with updated information about getting the materials and the tools you need.
Here’s the Updated Info

And Here are a couple of videos to entertain you from previous workshops:
[youtube]https://www.youtube.com/watch?v=JiCylYs6G0o[/youtube]
[youtube]http://youtu.be/MR3K_uxIOSs[/youtube]

Paper Circuits Workshop

I led a paper circuits workshop at the Auburndale Community Library, and I thought I’d share a few thoughts in case you’d like to try it on your own. By the way, all the photos in this post are by our host Dana Hanson, a good friend and one of the key volunteers that keeps the Auburndale community library going (with no municipal support!)

I let the library know that it would be ok for all ages, but if kids were under 7, a parent should stay to help. We got lucky in that we had a couple of parents who either got it right away or picked it up very quickly and they were able to help tremendously.

The first I saw this idea was on the MIT High Low Tech site and they have some good pointers. They use surface mount LED’s but they are quite difficult to tape, so we modified with regular LED’s.

Setting the basic rules: Lithium batteries need to be recycled (and don’t eat them…), What is a circuit (relating to circles…) watch out for short circuits, polarity of LEDs. This circuit is very forgiving, the internal resistance of the coin cell (we used CR2032) means you don’t need a series resistor to limit current for the LEDs, and also means that short term short circuits don’t destroy the battery immediately or cause a fire!

Some Clown

We set up a station to hand out materials at the circulation desk. Next time, I think I might divide it into several stations. The most time consuming part was letting them pick which LEDs to use. You could either limit it to one kind, or spread it out a little. You could have people just pick them from bins on the table, but sometimes people take too many. (It wasn’t a problem here….) My son’s Mason and Grant assisted me both in preparing and in debugging people’s circuits, and were indispensable.  25 Kids with about 80% of them needing help would be too much for one person.

Critical help

One of the mothers came up with a good way of making the connections more reliable add copper tape under the leads of the LEDs as well as on top.

Hard at work

Beautiful artwork

One of the book racks made a nice display for the finished work.Gallery of creations


Maker Workshops calendar

I’m very fortunate to be working with a number of wonderful libraries (and librarians!) doing maker workshops. I put together a google calendar of the upcoming workshops I’m leading. You’ll be able to find it in the menu on this site, and here’s a copy for your perusal now!

EL Wire workshop

I did a couple of EL wire workshops at the Newton Free Library yesterday. It was a great time, and I think everyone left quite happy. Here’s how I prepared, and what we learned during the workshop.

If you aren’t familiar with EL-Wire, or Electro Luminescent Wire, it’s a plastic coated wire that lights up when fed a fairly high voltage (~100V) high frequency AC signal of about 1000hz. (There’s a little more to it, check the wikipedia entry for a nice diagram of the internals…)

I ordered 55 Units that each had 3M of elwire, prewired, and a control unit that runs off of two AA batteries. I got them from an ebay seller (Sure Electronics) in order to get a good price. You can also buy them from domestic sellers like Sparkfun, but they end up being about 2x the cost. It’s good if you can talk to the Seller, as Sure told me that they sold two types, a less expensive one that was dimmer and a more expensive one that is brighter. I’m not entirely sure which one I got! The different colors were definitely different brightnessEL-Tie, with Greenish yellow being the brightest, and red/pink being quite dim in roomlight.

I wanted to create an example, so I sewed a segment onto a tie.

A couple of pointers here:

  1. Figure out where you want the battery pack to go.
  2. Start your layout from the battery end. It’s easy to cut off the other end (and safe) but it’s hard (but not impossible) to reconnect wires to the driver end.
  3. Scissors aren’t really strong enough to cut the el-wire, you should have some wire cutters on hand
  4. You can either attach as you go. or tape down your design. Most people felt that this created a more fluid design, but may make it difficult to properly lay out a complex design.

Methods of attachment:

  1. Tape. One kid used a type of very sticky first aid tape to tape his design (the Pi sign in the gallery below) to the back of his shirt. It made a really conforming design with a flat background. This wouldn’t look very good on the front of the shirt.
  2. Hot Glue. Be careful here, but it’s good, especially on things it’s hard to poke a needle through. Lower temp glue sets more quickly, but high temp is useful for attaching to some surfaces. If you are sloppy, it shows, but you can unglue the wire (still leaving a blob) by using a heat gun or hair dryer
  3. Sewing. This is the most invisible and elegant, but also the slowest and most work. If you use transparent thread, it’s even more invisible, but you’ll need to know your fisherman’s knots.
  4. Cable Ties: This is useful for attaching to, say a bike frame, or other tubular structure.

EL-Party time!

Last, make sure you turn off the lights at the end! We also had a dark closet available to test before we turned off the lights!

Here are some examples of the creations the kids made.

No photos

Simple 3D printing design activity


A lot of  libraries and schools are getting 3D printers, and also, if you personally have one and want to show it off, it’s hard to have people do things in a reasonable amount of time. 3D printers are just inherently slow.

One activity I came up with that allows you to do personalized 3D printing, is to, well, do 2D printing!

We’ll learn how to take some characters, make them into a flat 3D object that can be printed quickly.

This little logo printed in about 2 minutes on my Printrbot Plus.

We’ll be using inkcape (a vector drawing program) from http://inkscape.org, and OpenSCAD (a 3D drawing language) from http://openscad.org. Download and install (they are both free and open source!)

Here’s a video walk through, but details are also written below.

[youtube]XnpnsKFmvZE[/youtube]

Step by Step:

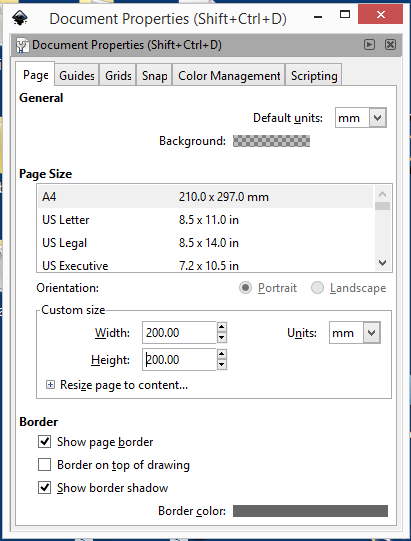
Open a new document in inkcsape. I like to change the document properties to use a real measuring unit, so I  can tell how big things are. Change the default units from px to mm, and the size in mm units to your print bed size. In my case 200×200.

Document Properties

Using the Text tool, type your name. I use 72 pt (about an inch or 25.4mm tall) and a font that is fairly blocky. If you want to print larger, you can use more filigreed fonts, but for this exercise, the point is speed, so we need something that will print well small.


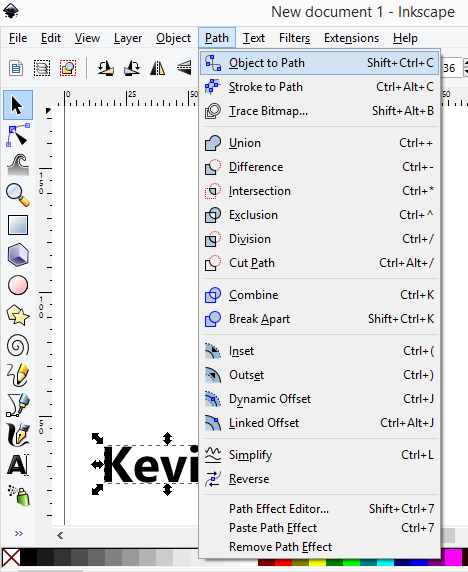
Select the name using the arrow tool, and then path/object to path:

object_to_path


Next click on the second icon down (below the arrow) that is edit path by nodes.

We’re not quite there yet, as we have a path, and we need polygons. Paths include things like splines and other curves. If you grab one of the handles you can see we don’t have straight lines.

It can be a little frustrating working with some of these tools, but there’s a secret OpenSCAD only understands polygons in a DXF file. If you have any splines or arcs, it just ignores them, sometimes giving a warning, sometimes not.

splines-bad


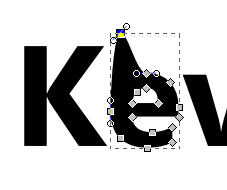
Shift select all of the letters while in path editing mode.

The key to converting any 2D vector drawing is to make sure to select all the segments and click the convert to lines button. Curvy letters like the lower case E in my name will reduce to angular uglies, so , you can add points by clicking the add points button a couple of times.

Next, click on make selected segments lines (make sure all the nodes are selected. If they are grey, they are not selected.)

Next, it’s a little tricky. Click on the second letter in path edit mode, switch to select/move mode (the arrow) and move the letter to touch the first one. Repeat. For the i, I moved it down so the dot was also touching.

At this point we have a bunch of polygons, and OpenSCAD may or may not be able to render it. You can make sure by selecting all the paths, and then perform a Path/Union menu function to simplify the shape.

It’s best to move the whole thing down to 0,0. You can do this with the mouse, or just type in the x,y box.

Next, save it as a DXF file (not the default SVG), in the same directory where you’ll store your openSCAD file.

Then it’s a simple matter of linear_extrude(height=2)import(“kevin.dxf”);

The dxf file has to be in the same directory as the scad file, so you have to save the scad file first before you run it.

It’s probably best to select print quality settings that don’t take too long, but still look ok. You can also influence the print time by extruding at a shorter height, but I think one mm is about the minimum for something you can remove without breaking