Category Archives: FamilyFun

MacGuyver Copter Part 1

You see a ton of projects on the web where they stick some motors on some sticks, and viola! a quadcopter. Thing is, those motors and full featured flight controllers are expensive. I wanted to try to scratch build a quadcopter from super cheap spare parts from the Syma X5c.

New Version Syma X5C 2.4G 6 Axis GYRO HD Camera RC Quadcopter RTF RC Helicopter with 2.0MP Camera By E-Trade Deal
Syma X5 X5c Quadcopter Full Part Set 4*motors Propellers Landing Skid Protectors Motor Base


Getting Started with Quadcopters

Of course I’ve been interested in multirotor aircraft like quadcopters. I am a geek after all! All the things I read about were about advanced hobbyist or professional models, and the price was prohibitive. Then I went to the Northern Virginia Mini Maker Faire, and there were drones everywhere! There was a shop that was selling nano-quads, for $40, and NovaLabs had organized a flying contest using a Syma X5 4 Channel 2.4GHz RC Explorers Quad Copter that can be had for less than $40 on Amazon.

When I got home I ordered the X5C version which has a high def camera and comes in under $50.

It comes with a battery (you might want to buy extras), transmitter, a charger, extra blades, prop guards and even a micro-sd card for the camera. You’ll need to add AA batteries for the transmitter.

I’m really glad I dipped my toes this way, as I’ve learned a lot, and there IS a lot to learn! I’ve tried to fly RC planes in the past, and found it just too hard and frustrating. While I did crash the X5C (a lot!) it’s pretty unbreakable, and comes with lots of spare parts. Since hovering is the general idea, it’s usually not that far away (though you can fly it pretty far away from you!)

How does it work?

It’s also easier to fly because the onboard computer and IMU (Inertial Management Unit, a fancy name for Gyroscopes and Accelerometers) keep the unit level in flight. Here’s a little video to demonstrate this:

Flying

Getting started, it is a good idea to use the prop guards especially if you are flying indoors. This aircraft is extremely light, so flying it outdoors is really difficult if there is more than light wind, though once you get the hang of it you can fly it in a breeze.

There’s also a button that lets you make it do flips! Be careful not to do it too near the ground or any bystanders, and it works better with the camera removed.

Video

The camera is for capturing pictures and video, and you do not get to see it in real time (that’s called FPV or First Person Viewing, and is a lot more expensive!) You have to remove the micro-sd card and load it on your computer (they even include a USB micro-sd reader!)

The video is pretty good, though in flight, it’s got a lot of vibration. Here’s a sample:

I’m going to experiment with unscrewing the camera and affixing it with foam mounting tape to see if the vibrations can be reduced.

The camera is also easily removed, if you want more flight time or to do more acrobatics.

What it isn’t

This quad doesn’t fly itself. My neighbor  (Check out his awesome youtube channel on Card Tricks, The Card Cave ) Has a $1500 DJI Phantom 3 Pro. You can tell it to auto take off, return to home, and if you set it to hover somewhere, it stays there, even if the wind is blowing (there are limits, but it’s pretty amazing.) These kinds of copters are enabled with GPS and magnetometers (digital compass) so they can stick to a heading or position, and be programmed to move between them. The video is on a brushless motor gimble that keeps the video rock solid, even when the quad is being buffeted.  You can set these fancy copters into “Acro” mode and fly it just like the Syma X5C, but frankly I’d be scared to.

What it is good for

  • Learning to fly. I’m interested in FPV racing and the principles are the same.
  • Learning how to fix a quad copter (cheaply). Every part of this quad is available (either through amazon or one of the chines sites like banggood.com). My son crashed it hard, and it bent the propeller shaft. I ordered a new motor mount for about $2, and I was back in business.

I’m even thinking about getting a full set of spare parts (less the camera and body) and trying to scratch build a quad from them. Stay tuned.

3Doodler 2.0 First impressions

IMG_20150425_181802While it’s true that I love geeky new toys, I’m not typically an early adopter, preferring to wait until the bugs are worked out. Several of my neighbors got the first generation 3Doodler, and since it first came out, there have been many imitators. I backed the 3Doodler 2.0 kickstarter, and it arrived when I was away visiting family.

Impressions

It was a little annoying that it came via DHL with signature required. I managed to circumvent that via their website though, and it was nice to know ahead of time that I had a package coming.

IMG_20150428_081610The new pen is Much Much sleeker and very pleasant to hold. I don’t have much experience with the first edition, but my impression was that it was clunky and it’s plastic case made me hesitate about spending $100 for an educational toy. The new design was a good part of what pushed me over the edge, and the metal case feels much more professional, and the mechanics seem to work really well. It comes with a little screwdriver to adjust the temperature, as well as a wrench to remove the nozzle and a cool spring thing to push through any unextruded plastic when changing colors.

Patience!

My 14 year old daughter initially almost threw it across the room in frustration. I think it was mainly a matter of expectations, as it does take a little while (after heating up) for a newly loaded strand to reach the nozzle. I also initially thought parchment paper (being heat resistant) would be good to doodle on, but it was a terrible choice as the plastic wouldn’t stick to it.

Doodling surface

We tried several other things, and eventually hit upon several good surfaces. It’s important not to doodle on a really cold surface (as our stone countertops are this time of the year in Boston) as the plastic shrinks quickly and comes unstuck. Some scrap acrylic worked really well, as did plain paper.

Once we had things humming along, Charlotte tried again and instantly did the cute baby dragon in the photo above. While it’s not a fast process, its quite meditative.

 3D vs 2D construction and materials

IMG_20150425_181857

It comes with a nice variety of materials, 2 packs of PLA, 2 Packs of ABS and one pack of flexible filament. If you want to doodle in the air and make 3D objects in place, your only choice really is ABS as it hardens quickly. It would probably also benefit from a desk fan to speed up the process. You can do some vertical stuff with PLA by doodling upside down and let gravity hold things straight for you.

Another option is to doodle 2 dimensional parts and then tack them together with the pen. 3Doodler has a number of fun templates on their website that you can print out, doodle over then peel off and tack together. I did their classic Eiffel Tower.

IMG_20150428_081539

The first thing you’ll notice is that if you want precision, and a clean aesthetic, you should just get yourself a 3D printer. That said the drippy organic look has it’s own charm.

The second thing you’ll notice is that I made it from Pink PLA, and there certainly wasn’t enough of one color in the packs to do the whole thing. I’m fortunate to have a 3D printer that uses the same diameter (3mm) filament, so I cut some lengths of PLA. Because filament comes on a spool, the radius of the segments turned out to be a problem, causing it to not feed well. Holding the curvey segments over the stove burner (probably not recommended, a hair dryer would be a better choice). and rolling them straight on the counter made quite usable sticks that fed perfectly. There are two tools which are handy (and not included). One is a pair of tweezers to safely remove plastic from the outside of the nozzle,  and a pair of cutters to trim the melty part off the end of a filament you’ve backed out when changing colors.  They recommend you trim the end when reusing filament, but I managed to get the original sticks to feed in fine with little melty blobs on the end, but YMMV.

Accessories

I was already exceeding my budget to buy the pen, so I didn’t opt for any of the accessories, though I was sorely tempted. They offer a nozzle pack (including cool ribbony flat nozzles) and a battery pack for portable doodling. There’s also a foot pedal, whIch would relieve some of the stress of pushing the button (but I got pretty good at freehanding in the continuous extrusion mode…)

One other really cool thing they did for their kickstarter was to offer education packs that gave a good price with a generous helping of accessories for educational institutions.

Conclusion

I think the 3Doodler 2.0 is a well engineered and fun gadget. I’m planning on getting together with my neighbors and we’ll compare with the first version, as well as get more kid reaction, but in general I think it’s a great creativity inspiring tool.


Preparing for a Bristlebots Workshop

The Earl Center folks at Wheelock college are doing Bristlebots at the Cambridge Science Festival and I put together a bunch of kits for them. I updated my resource page with updated information about getting the materials and the tools you need.
Here’s the Updated Info

And Here are a couple of videos to entertain you from previous workshops:
[youtube]https://www.youtube.com/watch?v=JiCylYs6G0o[/youtube]
[youtube]http://youtu.be/MR3K_uxIOSs[/youtube]

Holiday project: Dreideltron 5775

The Boston JCC  called me looking for maker activities for an upcoming Hanukkah event, and I thought of this little activity.

The copper tape is pretty unreliable though, and it may not be suitable for a big crowd where there may not be time to debug. I’d be curious to hear of other people’s experience doing paper circuits and the like. This was working perfectly for a while and then it stopped. I suspect the adhesive (which is supposed to be conductive), just stopped conducting. Perhaps I just need to buy higher quality copper tape?

Paper Circuits Workshop

I led a paper circuits workshop at the Auburndale Community Library, and I thought I’d share a few thoughts in case you’d like to try it on your own. By the way, all the photos in this post are by our host Dana Hanson, a good friend and one of the key volunteers that keeps the Auburndale community library going (with no municipal support!)

I let the library know that it would be ok for all ages, but if kids were under 7, a parent should stay to help. We got lucky in that we had a couple of parents who either got it right away or picked it up very quickly and they were able to help tremendously.

The first I saw this idea was on the MIT High Low Tech site and they have some good pointers. They use surface mount LED’s but they are quite difficult to tape, so we modified with regular LED’s.

Setting the basic rules: Lithium batteries need to be recycled (and don’t eat them…), What is a circuit (relating to circles…) watch out for short circuits, polarity of LEDs. This circuit is very forgiving, the internal resistance of the coin cell (we used CR2032) means you don’t need a series resistor to limit current for the LEDs, and also means that short term short circuits don’t destroy the battery immediately or cause a fire!

Some Clown

We set up a station to hand out materials at the circulation desk. Next time, I think I might divide it into several stations. The most time consuming part was letting them pick which LEDs to use. You could either limit it to one kind, or spread it out a little. You could have people just pick them from bins on the table, but sometimes people take too many. (It wasn’t a problem here….) My son’s Mason and Grant assisted me both in preparing and in debugging people’s circuits, and were indispensable.  25 Kids with about 80% of them needing help would be too much for one person.

Critical help

One of the mothers came up with a good way of making the connections more reliable add copper tape under the leads of the LEDs as well as on top.

Hard at work

Beautiful artwork

One of the book racks made a nice display for the finished work.Gallery of creations


Instant Party for Arduino Day!

[youtube]http://youtu.be/65PD9Plcd30[/youtube]You Do It Electronics in Needham asked me to help out with their Arduino Day celebration on Saturday March 29, and I wanted to make a nice Arduino demo that uses parts that they sell, relatively simple, and Fun! You Do It also sells DJ and disco equipment, so I thought what would be better than Arduino controlled Disco lights and Music?

Here are the Parts I chose:
Sparkfun Motion sensor (to trigger the Instant Party)
Sparkfun MP3 Shield
Arduino
Sparkfun proto-screw Shield (to make it easy to hook up.)
Power Switch Tail – turn on the disco lights

You’ll also need a micro-sd card and some music. I chose some Creative Commons Techno from Soundcloud:

https://soundcloud.com/captain-karacho/city-17
https://soundcloud.com/captain-karacho/brainwreck

First, we need to find out what pins are in use in the MP3 Shield so we can figure out where to hook up the motion sensor and power switch tail.
The easiest way to do that is by looking at the schematic, or this page at Sparkfun: https://learn.sparkfun.com/tutorials/mp3-player-shield-hookup/hardware-overview
MP3 Shield hookup

Digital Pins 5 and 10, and Analog Pins A0-5 are all free.

I used the analog lines because they are close to the power and ground pins for both the power switch tail and the PIR motion sensor.

Because the PIR output is open collector, I use the internal pullups on the Arduino.

Git the code here: https://github.com/osbock/InstantParty


EL Wire workshop

I did a couple of EL wire workshops at the Newton Free Library yesterday. It was a great time, and I think everyone left quite happy. Here’s how I prepared, and what we learned during the workshop.

If you aren’t familiar with EL-Wire, or Electro Luminescent Wire, it’s a plastic coated wire that lights up when fed a fairly high voltage (~100V) high frequency AC signal of about 1000hz. (There’s a little more to it, check the wikipedia entry for a nice diagram of the internals…)

I ordered 55 Units that each had 3M of elwire, prewired, and a control unit that runs off of two AA batteries. I got them from an ebay seller (Sure Electronics) in order to get a good price. You can also buy them from domestic sellers like Sparkfun, but they end up being about 2x the cost. It’s good if you can talk to the Seller, as Sure told me that they sold two types, a less expensive one that was dimmer and a more expensive one that is brighter. I’m not entirely sure which one I got! The different colors were definitely different brightnessEL-Tie, with Greenish yellow being the brightest, and red/pink being quite dim in roomlight.

I wanted to create an example, so I sewed a segment onto a tie.

A couple of pointers here:

  1. Figure out where you want the battery pack to go.
  2. Start your layout from the battery end. It’s easy to cut off the other end (and safe) but it’s hard (but not impossible) to reconnect wires to the driver end.
  3. Scissors aren’t really strong enough to cut the el-wire, you should have some wire cutters on hand
  4. You can either attach as you go. or tape down your design. Most people felt that this created a more fluid design, but may make it difficult to properly lay out a complex design.

Methods of attachment:

  1. Tape. One kid used a type of very sticky first aid tape to tape his design (the Pi sign in the gallery below) to the back of his shirt. It made a really conforming design with a flat background. This wouldn’t look very good on the front of the shirt.
  2. Hot Glue. Be careful here, but it’s good, especially on things it’s hard to poke a needle through. Lower temp glue sets more quickly, but high temp is useful for attaching to some surfaces. If you are sloppy, it shows, but you can unglue the wire (still leaving a blob) by using a heat gun or hair dryer
  3. Sewing. This is the most invisible and elegant, but also the slowest and most work. If you use transparent thread, it’s even more invisible, but you’ll need to know your fisherman’s knots.
  4. Cable Ties: This is useful for attaching to, say a bike frame, or other tubular structure.

EL-Party time!

Last, make sure you turn off the lights at the end! We also had a dark closet available to test before we turned off the lights!

Here are some examples of the creations the kids made.

Electrify Your Halloween! Making it Move!

In late September, I  led a workshop at the Duxbury Free library on making interactive Halloween displays, and more recently I set my project up on our porch for Halloween.  One of the most effective ways to make your front porch scary and immersive is to pay attention to sound, and to make things move.

The first part (making it scream) was documented in this post. This is about the movement part, creating a pop-up inflatable ghost, completely from scratch. It was very successful and popular!with the kids. Unfortunately I didn’t get any video, but I can cover the construction.

I like inflatables, and wanted to try making my own. One thing that made this really easy was a really cool product called Powerswitch Tail. This allows you to control an AC outlet from a digital signal. Its available from Adafruit and Makershed. It’s essentially a short extension cord with an opto-isolated relay in line. This eliminates any dangerous AC wiring with relays, and protects your Arduino and other circuits as well.

Next I needed to make the Ghost. I use white kitchen trashbags at home, and I took three of them, two laid end to end (with the end of one cut off.) I cut the third bag in in thirds and used the outside sections for arms. I used simple transparent packing tape to bond the edges.


A total of 3 bags (top and bottom, both arms)

I used one of those small vortex fans, and taped it around the output side.


Boo! Attached to the fan, and inflated.

Hook the powerswitch tail to a digital IO on an Arduino and you are good to go. As I mentioned in the last post, you can get the code on github here.


Electrify your Halloween! Making things scream!

In late September, I  led a workshop at the Duxbury Free library on making interactive Halloween displays, and more recently I set my project up on our porch for Halloween.  One of the most effective ways to make your front porch scary and immersive is to pay attention to sound, and to make things move.

In this post, I’ll cover making sound, the next post will cover my moving ghost.  There are lots of ways to make sound by control, and in reaction to people coming on to your porch. My original idea was to use a motion sensor, and then trigger an AC relay to turn on a cassette boombox. Because the boombox could have the mechanical play button pressed with the power off, when you turned the power on, it would play.

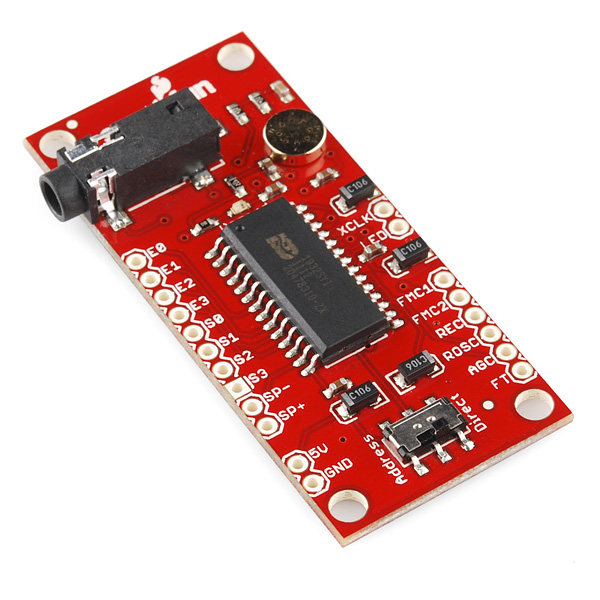
Then, I ran across the sparkfun voice recorder module at YouDoIt Electronics (my local hacker supply place!)

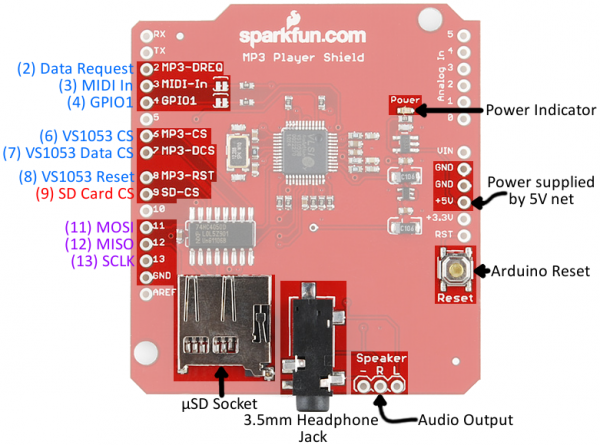
There are other ways to make sound (and probably easier) but this was fun, and I’d already spent the money. If I had to do it over, I might use either the Adafruit wav shield, or a new entry, the very cheap Garan MP3 Module from Seeedstudio (I’m probably going to order one of these for next year!)

This breakout is for a chip that was originally meant for a voice recorder with some buttons to trigger the different segments. It’s not very well documented on the sparkfun site, but one of the comments pointed me to http://ianlangelectronic.webeden.co.uk/#/voice-recorder/4562321245. That with the datasheet, let me build a simple Arduino library to control it. You can download it from github here.

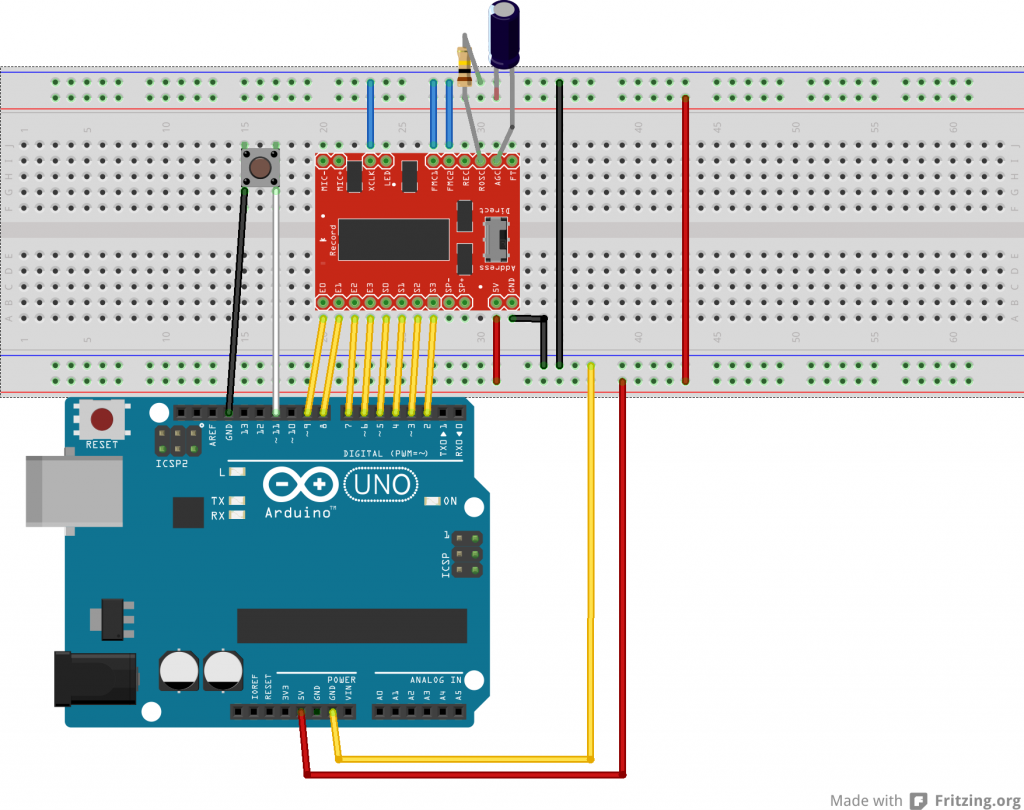
First you need to wire it up. Here’s a fritzing diagram showing the connections:

sound sampler hookup


In order to make it more reliable, I mounted it on a protoshield. I also like using a proto-screw-shield to hook up the external components.

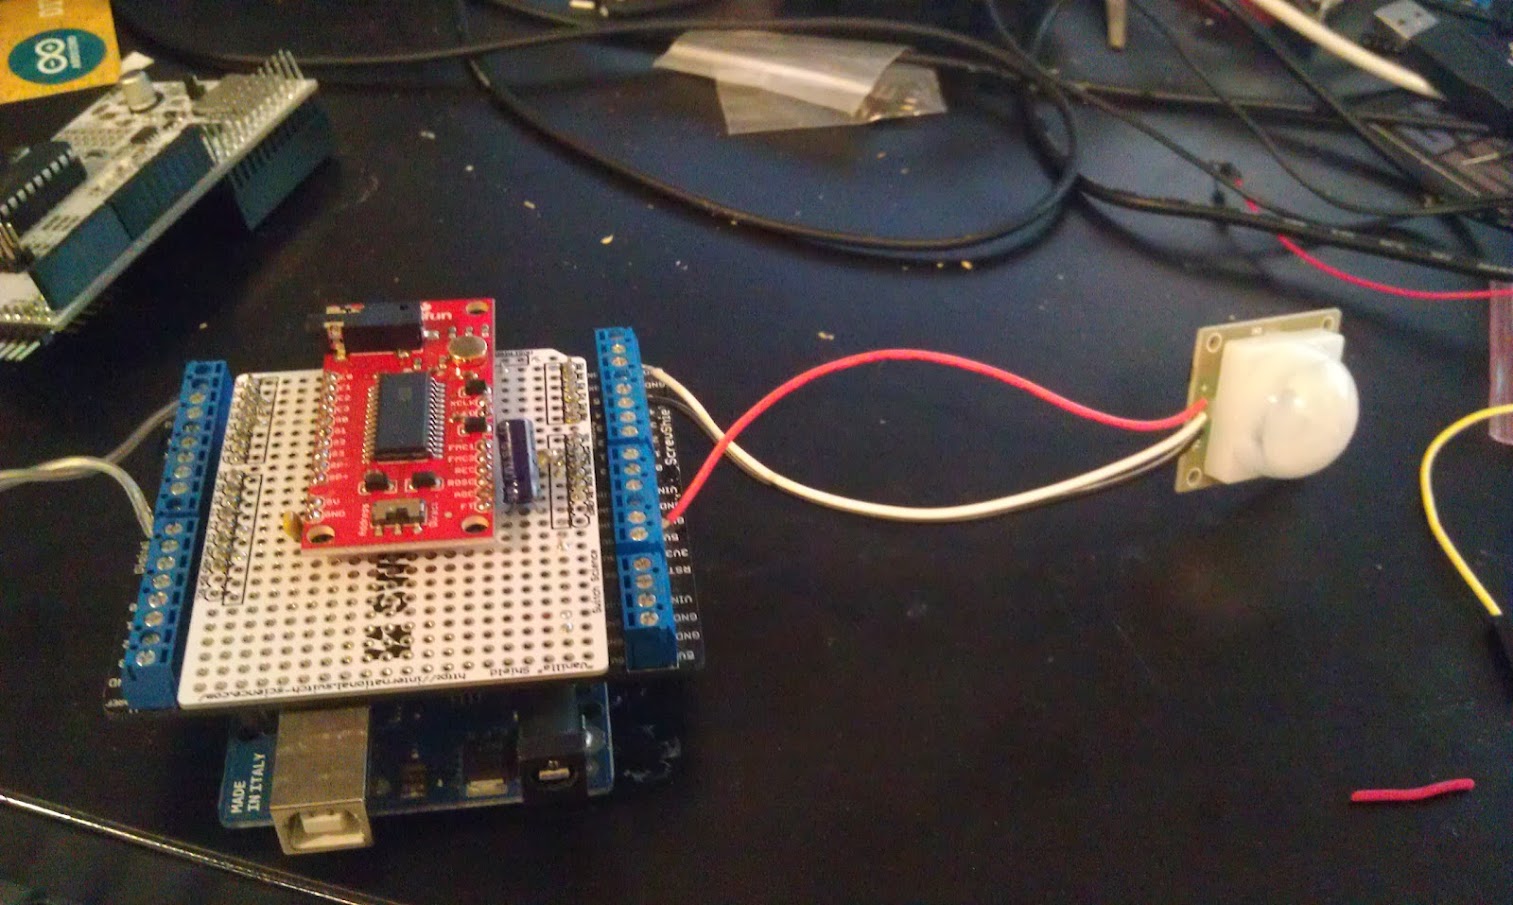
In this case, the motion sensor (https://www.sparkfun.com/products/8630) on the right, and the wire going off to the left connects to a powerswitch tail to control a fan for the ghost.

I used PC speakers connected directly to the jack on the sparkfun voice module.

A little about the PIR motion sensor. The data sheet says it operates at 12V, but sparkfun says it operates from 5-12V. I have a Parallax module that is a bit easier to use, but I couldn’t find it and once again YouDoIt rescued me with the sparkfun part. A few other things to note. Since it is open collector, you need a pullup on the input. I used internal pullups in my Arduino code. When I tried to run the system off of one of those USB battery packs, it was unreliable and had very short range. Using an AC adapter worked fine, but if I had to do it over, I might use a motion sensor designed for 5V. The other thing was that the wire colors were confusing. Ground was White, Signal was Black, and VCC was the only one that had a “normal” color of red. (GND is usually black.)

 The code

You can find the code on github here. You can control it via the serial port by entering a message number (0-8) and then ‘r’ or ‘p’ for record or play. It uses the onboard microphone for recording.

I chose to use the button on the protoscrew shield as an arming button, but you can also control that through the serial port. ‘m’ toggles whether or not motion activates the sound and PowerSwitch tail output.

Here’s the complete code (at the time of this post) remember to install the ISD library first:

[code]

#include <ISD.h>
// delay between motion activations
#define ACTDELAY 10000L
// motion sensor
#define MOTION A4
#define ARMButton A5
// powerswitch tail
#define powerSwitch 7
// LED
#define LEDPin 13
ISD isd = ISD();

void setup() {
Serial.begin(115200);
// motion sensor
pinMode(MOTION, INPUT);
// open collector requires pullup
digitalWrite(MOTION,HIGH);
// powerswitch
pinMode(powerSwitch,OUTPUT);
digitalWrite(powerSwitch,LOW);
pinMode(ARMButton, INPUT_PULLUP);
pinMode(LEDPin,OUTPUT);
Serial.println(“enter a message number to play or record or r/p”);
}
// globals
int msg =0;
boolean motion = false;
boolean soundonmotion = true;
boolean powerswitchonmotion = true;
int lastReading = HIGH;
boolean ARMState = false;
long lastActivation = 0L;
void loop() {
// check arming button
if (digitalRead(ARMButton) == LOW){
ARMState = ARMState?false:true;
// cheap debounce
delay(500);

if (ARMState){
digitalWrite(13,HIGH);
soundonmotion = true;
motion = true;
powerswitchonmotion = true;
Serial.println(“Armed!”);
}
else{
digitalWrite(13,LOW);
motion = soundonmotion = powerswitchonmotion = false;
Serial.println(“Unarmed”);
}
}
//check motion sensor
long currentTime = millis();
if (motion){
int currentReading = digitalRead(MOTION);
if ((currentReading != lastReading) && (currentReading == LOW) && ((currentTime – lastActivation) > ACTDELAY)){
lastActivation = currentTime;
Serial.println(“activating motion”);
// if enabled turn fan on first
if (powerswitchonmotion){
digitalWrite(powerSwitch,HIGH);
delay(1000);
}
if (soundonmotion)
isd.play(4);
if (powerswitchonmotion){
delay(5000);
digitalWrite(powerSwitch,LOW);
}

delay(1000);
}
lastReading = currentReading;
}

if (Serial.available() != 0)
{
char c = Serial.read();
if (c >= ‘0’ && c <=’8′)
{
msg = (int)(c- ‘0’);

Serial.print(“msg selected: “);
Serial.println(msg);
}
else if (c == ‘r’)
{
isd.record(msg);
}
else if (c == ‘p’)
isd.play(msg);
else if (c == ‘m’){
//toggle motion activation
motion = motion?false:true;
Serial.print(“motion is “);
Serial.println(motion);
}
else if (c == ‘f’){
powerswitchonmotion = powerswitchonmotion?false:true;
Serial.print(“powerswitch is “);
Serial.println(powerswitchonmotion);
}
else if( c == ‘s’){
soundonmotion = soundonmotion?false:true;
Serial.print(“sound is “);
Serial.println(soundonmotion);
}

}
}

[/code]